Shadowdale - The Twisted Tower
The oldest and most prominent building in Shadowdale, the Twisted Tower is the traditional home and seat of power of the lord and lady of Shadowdale, who are, at the present time, Lord Mourngrym and Lady Shaerl Rowanmantle. It was originally built by the drow over a millennium ago though it has been continually rebuilt, and has been retrofitted for its present occupants.
The history of the Twisted Tower is the history of the Dale itself and its lords, and is covered in the "History of Shadowdale" chapter of this book. The Twisted Tower takes its name from its off-balance appearing main tower, which is used as a landing platform for flying steeds.
The Key to the Twisted Tower covers this historic Realms monument. The DM may feel free to move around individuals and rooms and to use the Tower as a model for other castles which the PCs may discover and take possession of.
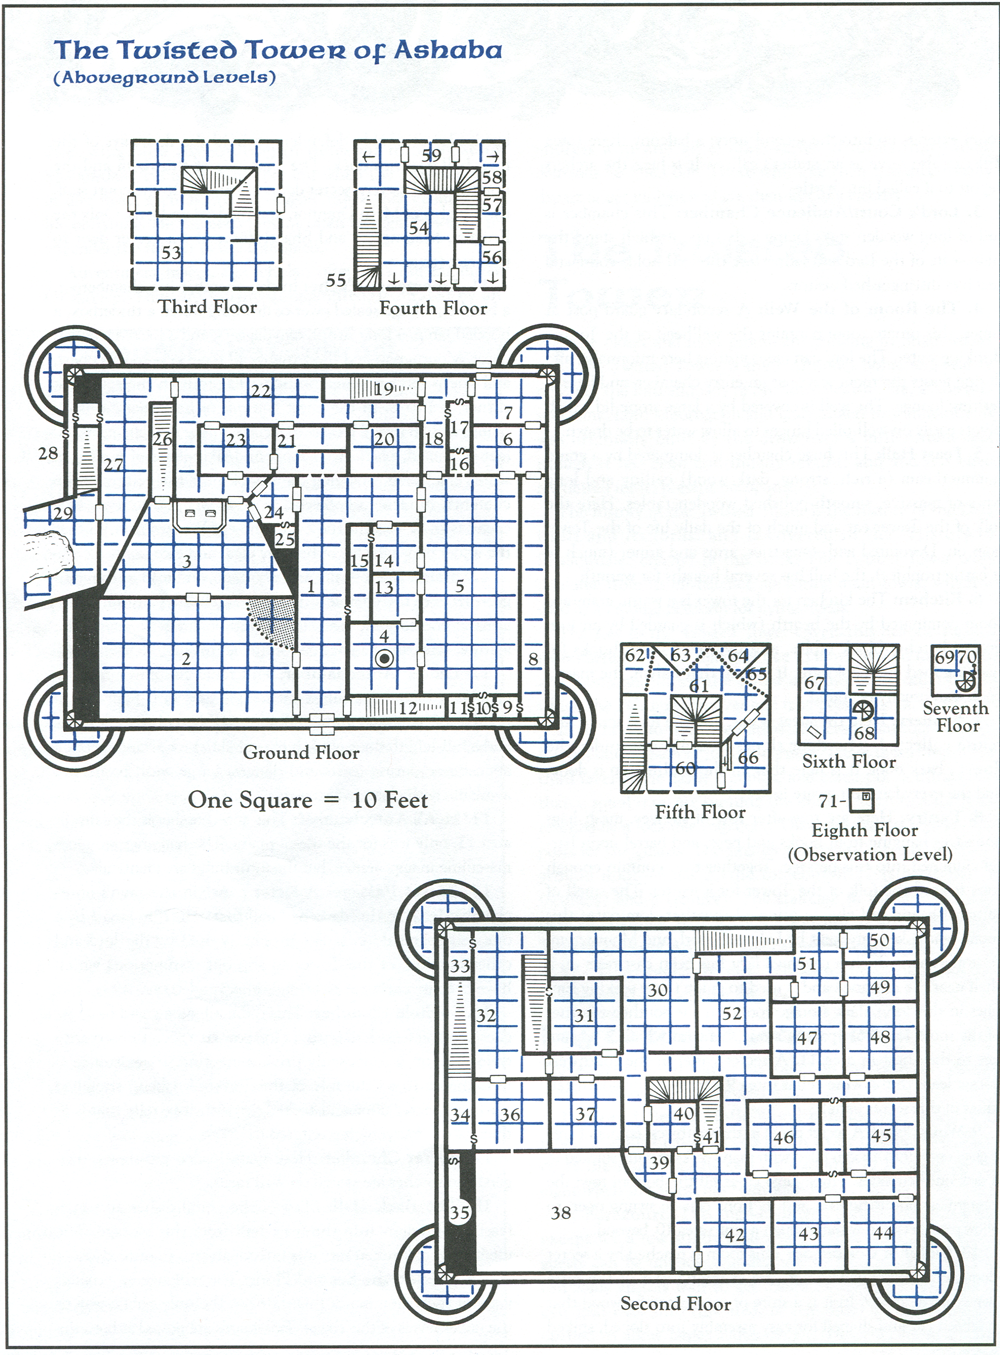
In addition to the keyed areas, the castle has four turreted towers, one at each of its four corners. There towers reach the third level of the castle complex, and consist of nothing more than a spiral staircase running the entire length to a top floor, reached by a lockable trap door. These are used as regular duty posts for the guards. The smaller towers are accessed from the ground floor - areas 2 (the forecourt), 27 (storeroom), 7 (scullery) and 8 (pantry). The staircase in the southwestern tower continues below ground, exiting at area 14 on the Twisted Tower of Ashaba (The Dungeon Level) Map.
The Tower cannot be magically seen into (scryed), but can be teleported into and out of.
Key to the Twisted Tower
These entries cover the rooms found on the Twisted Tower of Ashaba (Aboveground Levels) Map.
1. Grand Entry Hail: Wood-paneled and hung with tapestries, this high-ceilinged hall is lit by torches and guarded at the front door by two men-at-arms in times of peace, eight when the alarm has been sounded.
2. Forecourt: This high-ceilinged (120) room is empty except for a few sturdy chairs and tables. Here the gear of guests can be unpacked under cover from rain, extra guards can wait, visitors wait to get into area 3, parties from area 5 can spill over into this area, or the doors to area 3 can be opened to allow larger audiences for important matters. This room extends up into the second story; a balcony there (area 39) can serve as an archer's gallery. It is here the archers report to if called into battle.
3. Lord's Court/Audience Chamber: This chamber is full of long wooden seats facing a dais upon which stand the high seats of the lord and lady. Here the lord holds Court and receives distinguished visitors.
4. The Room of the Well: A secondary guard post at times, this ornate room contains the wellhead of the Tower's drinking water. The lord can meet visitors here informally, and during feasts, the room serves as an entry chamber, and latter, retiring lounge. The well is covered by a large Stone lid which pivots easily on well-oiled hinges to allow water to be drawn.
5. Feast Hall: This huge chamber is dominated by a grand hammerbeam ( a rich, strong, dark wood) ceiling and long rows of massive, smooth-polished wooden tables. Here the folk of the Tower eat and much of the daily life of the Tower goes on. Decorated with tapestries, arms and armor (much of it battle trophies), the hall has several hearths for warmth.
6. Kitchen: The kitchen for the rower is, a warm, crammed room dominated by the hearth (which is guarded by an iron grate), butcher-block tables, and overhead beam hooks for hanging food and cookware. It is here that Lalym, the master cook, can usually be found.
7. Scullery: Here the meat is cut, and the food scraps and refuse collected. The floor slopes to drain out under the Tower's back door. It is here that all the washing up is done and the everyday dining-ware is stored.
8. Pantry: Here are row after row of shelves, mesh bags and sacks hanging from hooks and pegs, and barrel upon barrel crammed into this passage. Together they contain enough food to feed the folk of the Tower for a winter. The smell of salted fish and old cheese mingled together dominates the room, whose keys are kept by Lalym, Shaerl, and Mourngrym. A stone upon which a continual light has been cast rests on a shelf near the entrance and is used to guide those seeking supplies in this long, dark storage room. In the southeast corner of the room is a loose paving stone, beneath which is a spare key to the chest in area 11. A secret panel in the southwest corner leads to the wine cellar (area 9). Most of the court staff know of this secret panel.
9. Wine Cellar: A secret panel in the southwest corner of area 8 gives entry into a room filled with many casks of wine stacked in a rack on their sides. Three large casks fill the bottom row; the center-most one is hollow, and its front can be swung open to allow passage (by crawling through it) into area 10, beyond.
10. Closet of Cordwood: This room is reached by a secret door from area 5 or through the swinging rear of the false wine cask in area 9. In it is a store of emergency firewood that has been cut and shaped for easy assembly into sloped, spiked barricades to enable defenders to hold the doorways of the feast hall against attack. The existence of this room and the northern and eastern secret doors are known to the Court staff, the Knights of Myth Drannor, and the lord and lady. Only the Knights, Mourngrym and Shaerl know of the secret door to the west (to area 11).
11. Emergency Cache: In this chamber is a chamberpot, a blanket, a large sealed ewer of drinking water, a tinderbox, a hooded lamp, a long sword, two daggers, and a locked wooden chest. Mourngrym and the Knights all have keys to this chest, and one is hidden beneath a loose flagstone in the southeast corner of area 8. In the chest is a ring of free action, a rod of smiting (17 charges), a cloak of the hat, a robe of useful items, 60 feet of waxed, black-dyed rope, and six potions of healing in sealed steel vials. Hanging on a hook near the ceiling of the chamber, hidden in cobwebs, is a ring of spell turning. This cache is to be used in the event the castle is overrun, so that the finder may fight his or her way clear and escape.
12. Stairs: These stairs are very steep, and lead to the dungeon level of the complex. There are always a pair of men-at-arms at the top and bottom, as well as gongs to sound the alarm if something comes out of the depths.
13. Ladies' Antechamber: This room contains a number of jakes (toilets) curtained off for privacy with hangings, a number of hanging lamps, and a long table with sitting stools and a full-length floor-glass (a cheval glass) for arranging one's appearance during feasts and dances. Large wash basins are available with clean, warm water.
14. Men's Antechamber: This antechamber is the same as area 13, only it is for the use of males. The hangings are more masculine in appearance, but the furnishings are identical.
15. Secret Passage: A secret panel in the men's antechamber leads to this darkened hall that exits into area I by a one-way secret door. It is customarily used by the lord and other menfolk of the Tower to slip out of functions which have become boring or to attend other rendezvous.
16. Spyhole Chamber: This room allows a guard to cover guests in the feast hall with a crossbow or a secret observer to eavesdrop on a supposedly private meeting. Its existence is well-known to all the folk of the Tower. A ribbon stretched across its secret door and tacked on with wax tells guards as they patrol if anyone has entered it.
17. Secret Chamber: Here spare loaded crossbows, daggers, and torches are stored on wall racks.
18. The Back Hall: Most of the grand dishes at a high feast are brought into the feast hall from this passage. The useful flow of kitchen servants is through area 6, instead.
19. Stairs to the Second Floor: The radiance of a continual light spell illuminates this stairway, the only public way to the upper levels of the Tower. Two guards are posted at both the top and bottom of this stair at all times, and pages are stationed here too when the lord has distinguished visitors to aid the infirm or long gowned in ascending or descending the stairs.
20. Duty Room: Here linens are stored, and servants who are on ready duty wait for bell or gong signals. Servants may also change, bathe, or sleep here (or slip away for quiet games of chance among themselves).
21. Guards' Ready Room (the Watch Room): Here guards coming on or off duty store and ready their gear, and the guard's captain takes his ease between rounds. An inner partition separates the everyday part of the room from the firing-port area, where crossbows are kept ready on racks and a large mechanical triple crossbow mounted on a swivel is kept loaded. Ordinarily pointed at the ceiling, this fearsome weapon can be lowered by means of a pull cord and fired through the ports directly down the grand entry hall. Its shafts do triple normal heavy crossbow damage (3d4+3/3d6+3) each. Normally six men-at-arms are found here.
22. Servants' Common Room: Here the servants live and dine. Old, sturdy furniture retired from other duty in the Tower crowds this room, which is always hung with drying aprons and uniforms that dangle from lines which crisscross the room from torch bracket to torch bracket. It is a comfortable, cheery place.
23. Guards' Quarters: This is a rather Spartan guardroom lined with triple-tiered bunk beds and crowded with arms chests used as tables. Weapons are always ready in this room, and here the guards sleep, oil and sharpen their weapons, and gamble stiff sums back and forth. About a dozen guards will be found here at any time.
24. Chamber-of-State (Guards' Court): This court is a dark, wood-paneled, tapestry-hung room where a detachment of four duty guards are always waiting to reinforce other guard posts as needed or to run to their lord's bidding. A secret panel to the south leads to the armory.
25. Armory: This closet is lined with racks containing all manner of polearms and is largely filled with a gift from Elminster: a magically animated suit of armor known as a helmed horror, which will attack as Mourngrym, Elminster, or Lhaeo, or Shaerl directs. It is build to respond only to the commands of those four. The helmed horror is activated if the Tower is under direct threat. It is armed with a bastard sword +1.
26. Lord's Stair: This private stairway leads from area 3 to area 32. Part of the way up it, a secret door fitted with a spyhole (the spyhole is concealed in a relief carving on the other side) opens into area 31. Through this, a lord (or other inhabitant of the Tower who knows of the spyhole) could spy upon (or communicate or enspell) a guest who was lodged in area 31.
27. Storeroom: In this room are kept goods held in the Tower for later loading into boats to go elsewhere and goods brought in by boat that haven't yet been dispersed into their customary storage places around the Tower, It may vary from being filled with supplies to being empty. Its sole permanent occupant is Tohsgnol, a lazy, black-and-white cat who rarely seeks out the field mice that infiltrate the room.
28. Secret Stairs: This hidden staircase connects a secret room on the second floor (area 34) with the outside and with area 27. Traditionally, this was the lord's secret way in and out. Once, long ago, it led on down to the dungeon level in the northwestern corner of the Tower (now filled in with rubble) by means of a circular staircase descending from this landing. This route lasted until things from the depths started rising it to get up into the Tower. Now weeks of digging would be required to reach the dungeons. Mourngrym keeps an old cloak and a spare sword here, and has the only keys to these two locked secret doors.
29. Boathouse: A crowded, low-beamed shed built of wood, this ramshackle structure is used to load and unload barges heading to and from Mistledale. It also provides a handy escape route for those seeking to flee the tower without saying good-bye. Ropes, boards, mallets, and nails to spare can be found here, as well as tar, paint, canvas, wax, and a thousand other useful things. A single guard is usually stationed here.
30. Parlor: This luxuriously furnished chamber provides lounging space for all who live in the Tower or who are visiting. Its westernmost arm always contains two watchful guards (they command a spyhole into area 31, if they desire), and it usually contains Bracegot, the tower butler, or a footman, ready to assist or to serve the drinkables kept ready here.
31. Grand Guest Bedroom (the Murder Room): Most opulently furnished of the apartments of the Tower, this room is also usually vacant. Reserved for the most noble guests, it boasts a magnificent canopied bed, a private bathtub, and so on - and is a place designed for easy spying on the guest within. More than one lord of Shadowdale, history whispers, has used its secret door to murder or spend the night with on occupant.
32. Lord's Chamber: This chamber is the opulent lounge, office, and sitting room of the lord of Shadowdole, furnished with sofas, paintings, carvings, a desk, a large dining table for private meals or meetings, and similar items of the well-to-do noble lord and his lady.
33. The Lord's Wardrobe: This is a walk-in clothes closet that is illuminated by a continual light rock and crammed with clothes, boots, cloaks, swords, and costumes. Mourngryn keeps a couple of disguises in here (Shaerl has made him beautiful gown, just his size), as well as Shaerl's professional (thieving) gear.
34. The Hidden Chamber: This secret room is connected by stairs to area 28, which has access to the outside and the level below. The room offers the lord an escape route. Mourngrym keeps a long sword +2 hanging here and a little box containing 6 gp, 4 pp, a bloodstone worth 50 gp, an opal worth 2,000 gp and a ring of invisibility.
35. Treasure Cache: This hidden room contains whatever riches the DM desires the lord to have (with whatever guardian traps or creatures deemed appropriate). For examples, see the sidebar.
36. Lord and Lady's Bedroom: This large room is comfortably furnished with a canopied bed of great size and a private bathtub. It also features a spyhole allowing the lord to see and hear what is going on in area 2, below. This spyhole comes with a cork plug and cloth flap to stop telltale sound and light when the lord does not wish to use it.
37. The Daughter's Room: This bedroom gained its name from a time when a long-ago lord had only one heir - a daughter. It is currently the second-best guest bedroom, a cheerfully furnished place.
38. An Empty Space: This space is the upper part of area 2, the high-ceilinged forecourt. Long brass poles, fitted with pulleys and cords and hung from the ceiling here permit banners to be hung from area 39. On more than one occasion in the past, grisly trophies of the hunt have been hung from these poles down into the forecourt. An intrepid knave can swiftly descend from area 39 safely to area 2 by means of these pulley-cords, but the guards usually stationed in area 39 discourage such activities.
39. Minstrels' Gallery: This ornate, tapestried balcony is usually called simply "the balcony," and is used either by guests, watching new arrivals or by two guards armed with crossbows (and also watching those below). A long brass trumpet (suitable for blowing fanfares and warnings) hangs on the wall here.
40. The Bower: This cushioned, curtain-hung courting chamber is faintly lit by the pale red radiance of a permanent faerie fire spell and gently scented with herbs and flowers (in summer) and incense (in winter). It is a cozy chamber, usable by anyone and made use of by many. A secret door leads to area 41.
41. The Stairs Aloft: This stairway leads up from the main living floors of the Tower to its more military upper levels (traditionally known as "aloft" because of the Tower's off-center spire).
42. Bedroom: Formerly used by Jelde Asturien of the Knights, this room is currently home to Aseel, châtelaine of the Tower.
43. Bedroom: This room is formerly that of Islif Lurelake (before her marriage to Doust Sulwood, the then-lord of Shadowdale), and is now shared by Sammeth (cellarer), Bracegar (butler), and whoever is newest to the Tower staff (whom they train and watch for a time).
44. Bedroom: Since first decreed so by Sylûne (lady of Shadowdale in the time of Lord Aumry), this room has always been reserved for the sage Elminster (and Lhaeo, or any current apprentice), whether he chooses to use it or not. Mourngrym maintains the decree, but has put up other individuals in it.
45. Bedroom: Formerly that of Lanseril Snowmantle of the Knights, this chamber is currently used by Lalym, Sedros, Massim, and Purk (the four male cooks - Purk having graduated from kitchen-boy status). At least one cook is always on duty at any given time down in the kitchen.
46. Bedroom: Formerly home to Florin Falconhand of the Knights, this room is currently occupied by the herald Essen, and the pages Samal and Heth.
47. Bedroom: Once home to Merith Strongbow of the Knights, this room now serves as a guards' bunkroom.
48. Bedroom: Once home to Jhessail Silvertree of the Knights, this room is shared by the constables and more of the Tower guards. It has a fireplace in the northeast corner.
49. Bedroom: This room is usually home to the serving girls.
50. Bedroom: This room is used by the chambermaids.
51. Maids' Common Room: In this room, clothing is constantly being made, altered, or repaired. The maid's jakes are to the southeast.
52. Bedroom: This bedchamber is home to the senescal, Turnal Rhestayn, and Thurbal, now captain-of-arms. There are beds for both here, but the two are never both asleep the same time; if one is sleeping, the other is on duty.
53. Guardroom/Conference Room: Customarily Thurbal's office and Mourngrym's place to hold private and confidential discussions, this room becomes the center of the Tower's defense if the Dale is under attack.
54. Defense Level: This floor is the center of long-range castle defenses. A trio of ballistae are set up in this area. All rooms on this level are of bare stone with stone doors (to keep fire damage to a minimum in the event of fireball attacks), and contain firing ports that can be shuttered from within for safety or winter warmth.
55. Stairs to the Fifth Floor.
56. South Guardroom: Known as the sun room to the guards (and a favored post for a two-man patrol). Holds a single ballista.
57. Shooting Gallery: This chamber overlooks the Tower meadow, also called the common.
58. Guard Post: This room contains a ballista, identical to all others in the Tower's arsenal.
59. Shooting Gallery: The guards call this room the cold gallery, due to its northern location and the cold winter winds that find it.
60. Guard Room: A half-dozen guards on duty in the aloft section of the tower usually use this area as their base.
61. Stairs to Sixth Floor.
62. Pen: In small cages in this pen are kept a few live birds destined for the Tower pots (such as pheasants and pigeons) and a few messenger-pigeons. This pen has a full, heavy-duty barred gate like the others (63-65), and can be used fur larger aerial steeds.
63. Pen: Home to a hippogriff.
64. Pen: Home to another hippogriff.
65. Pen: Home to another hippogriff.
66. Flight Deck: This large landing deck that gives the Twisted Tower its name is guarded by a ballista (behind a parapet). Hooked to the parapet is a wooden frame that can be raised and attached to chains on the tear wall of the deck to create a row of menacing stakes facing any creature trying to ram or charge at the larger door leading from the deck into the Tower proper.
67. Shrine to Tempus: A larger shrine to the war god has been established out near Tower Farm, and Mourngrym is considering using this space for other purposes. The men-at-arms are uneasy with the idea of this shrine being removed, given that Shadowdale has been fortuitously victorious in its battles with it present in the tower.
68. Stair to the Seventh Floor.
69. Meditation Area: The meditation area is tastefully furnished with a bedding mat and quilt, a chamber pot, and a clay jug of water.
Ballistae
Ballistae in the Dragon Reach area are made of wood and are no more than huge crossbows mounted on swivels and cocked by use of a windlass. They fire spear-like metal shafts (or even normal polearms, in a pinch) to a maximum distance of 320 yards, inflicting 2-12 points of damage to man-sized and smaller targets, and 3-18 points of damage to larger creatures. A ballista can fire once every other round when crewed by two people; its rate of fire falls to every fourth round if one person loads, aims, and winches it. The ballistae in the Twisted Tower are too heavy to carry and use unaided, and cannot readily fit through the door-ways and passages of the Tower if removed from their mounts.
70. Ladder (Wall Rungs) to Eighth Floor: This ladder leads to a barred trapdoor hung with an alarm gong.
71. Tower Roof: This area is an open platform surrounded by a low parapet and surmounted by a flagstaff This area is used occasionally as an observation deck.
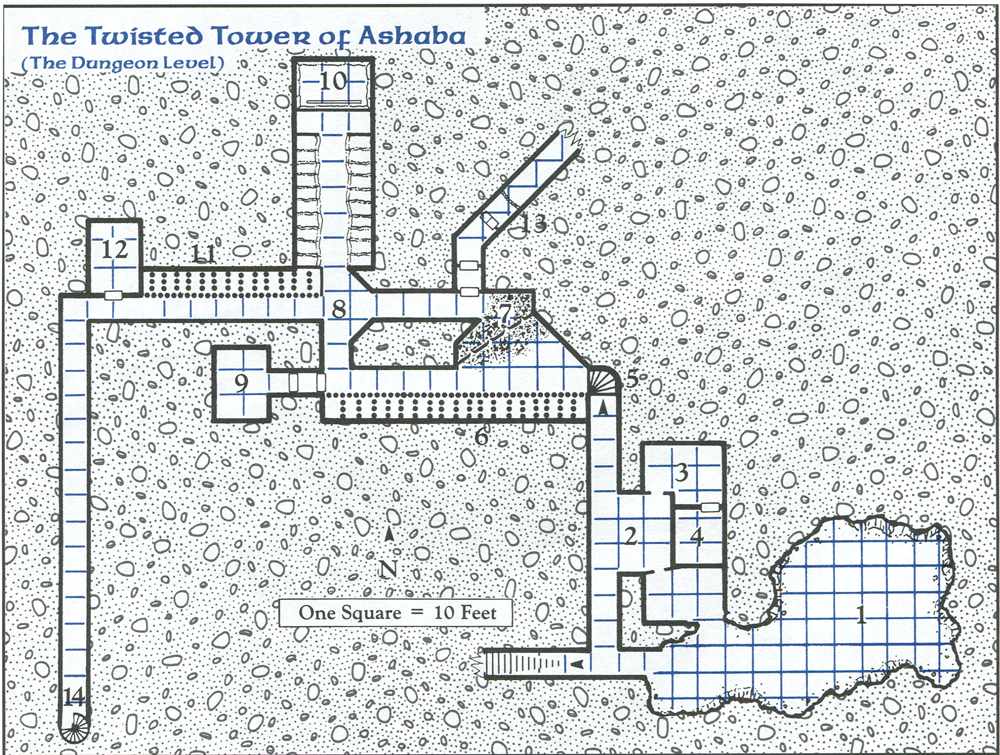
The Dungeon Level of the Twisted Tower
This level of the Tower is very old, as it was built long ago by the drow of the depths. Area 1 is noticeably more recent than the rest; the exposed, irregular faces of its rocky walls are brighter and less dusty than everywhere else. This level is reached by a very steep flight of stone steps from the ground floor, which drop over 80 feet in about 35 feet of run.
1. Blast Cavern: This large cavern (caused by a recent explosion) contains six guards playing thabort and other games of chance at a table. Behind them are stacked crates of bottled beer, barrels of pickled fish, and other foodstuffs sufficient to see the tower through the coldest winter or the most resolute siege. The area is lit by a continual light, but there are also torches thrust into holes carved in the rock wall: two of the six torches are lit.
2. Cellarer's Stores: In this room, several large beer casks stand on end against the east wall. Atop one is a pile of slates. Atop another are some lumps of chalk, an oiled wooden box at containing needles, and a small chest containing four balls of waxed thread wound around sticks. The third barrel holds a tinderbox and an iron cage-lamp. On the floor beside it is a stoppered earthen jar. If the wax seal is broken and the cork removed, flammable lamp oil will be revealed.
3. Wine Cellar: Many huge barrels (rolled into place by two people, and hauled up the stairs by six people with rope cradles - no less will do) are crammed into this unlighted chamber.
4. Storage: Old furniture, much of it in disrepair, is stored here. Chairs ate stacked seat-to-seat, tables stacked three high, and iron lamp-standards lean in an untidy bundle against the wall.
5. Lighted Steps: A continual light radiance has been cast on this rising curve of worn stone steps. A niche in the wall contains an unlighted torch, a full, unlighted oil lamp, and a tinderbox.
6. Dungeon-Southern Cells: At the eastern steps is a guardstool, with a chamber pot and a tall copper water flask beside it. Seven unlighted torches hang in brackets around this chamber, which is covered by a two of firing-ports cut long ago by the drow (to defend the entrance to their tunnels). Fifteen dungeon cells (with stone walls and iron-bar front walls and doors) line the south wall of the corridor.
7. Rubble Chamber: This chamber is choked with stone rubble, the remains of an earlier battle in the depths. Rather than remove the rubble, Mourngrym plans to eventually wall this section fully shut. This area contains firing-ports commanding the antechamber to the southern dungeon cells at area 6. However, the rubble blocks their use.
8. Intersection: This intersection is empty save for some stone rubble half-heartedly moved here from area 7.
9. Private Library: The keys to this chamber are kept by Elminster, Lhaeo, and Mourngrym The doors are guarded by the DM's choice of glyphs and symbols; if they are forced, a spell set by Elminster will cause the bookshelves in the room, the easy chair and table there, and the rug beneath them all to vanish into the Ethereal Plane (temporarily), leaving only a smudged chalk circle (from a long-ago summoning) on the floor in the room.
10. Crypts of Lords of Shadowdale and Shrine to Sylûne: A corridor lined with crypts containing the stone caskets of the past lords of Shadowdale leads to a chamber illuminated by a continual light radiance. The wide chamber at the end, once used as a torture room and before that as a drow temple is now a shrine to the memory of Sylûne.
The shrine appears as a large stone casket, inscribed with the following dedication:
Witch of Shadowdale,
Wife Of Lord Aumry.
Lived to protect the Dales
and perished in that manner;
Year of the Prince.
Sylûne's remains are not within, but are rather laid with those of her husband in a crypt on Watcher's Knoll.
From time to time a phantasmal force image of Sylûne (a kindly, smiling woman in a plain, silver-gray gown, beautiful, slim, and tall) will appear here, sitting calmly atop the casket or striding gracefully about. If intruders enter these depths, and reach as far as the corner outside area 9, Sylûne's image will charge in terrifying silence down the corridor towards them, but will pursue no further than that same corner (consider the PCs as intruders). At this time, the image will glow silvery-blue. It will be unaffected by magic or attacks, but in turn has no effect on anything solid. The side tombs are all sealed. The Knights of Myth Drannor destroyed many undead here, and believed that they had "cleaned the place out."
11. Dungeon-North Cells: Fifteen dungeon cells with stone walls and iron-bar front walls and doors line the northern wall of the corridor.
12. Underground Barracks: This guard room contains sufficient supplies and weapons to gather and stage a counter-attack in the event that something unpleasant comes out of the depths and threatens the Tower. Two guards are stationed here, and if there are prisoners in the north cells, another pair will be found here as well (four total).
13. Dark Wood Defensive Doors: Here are a set of impressive doors carved of dark wood. They are unlocked and can be swung easily on their hinges. Cut into the doors is the following inscription in common: "Here of old humankind defeated the dark ones and drove them back under the earth. The drow built this place to defend their tunnels. If we do not watch, they will yet make it our tomb."
The doors are not locked, as the true entrance to the Underdark is found further down the hallway. They can be secured if danger does come up the hallway.
Beyond this stage is the Underdark found beneath the Old Skull.
14. Spiral Staircase to Southwestern Corner Turret.